| Time: | 2 days |
| Distance: | 36 km |
| Fitness: | MH |
| Skill: | EM |
| Ascent: | 890 m |
| Maps: | LPI Kanangra 8930-3S 1:25000 |
| LPI Yerranderie 8929-4N 1:25000 | |
| Notes: | Print-friendly notes (opens in new window) |
Introduction
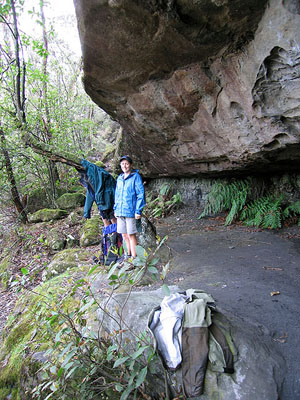
Coal Seam Cave
The Kowmung River is a wild river, one of the least touched in NSW. The Gingra Range separates Gingra Creek from the Kowmung River. The track out along the Gingra Range is the most gentle descent to the Kowmung, although a longish walk as a result. There are good views from the Kanangra Tops and from Cottage Rock on the way.
The route is on track, though at some places on the Gingra Range it can be indistinct, and parties should be competent at navigation. The navigation is fairly straightforward.
This is a fairly long ridge walk, so is best in the cooler months.
Access
The walk starts at Kanangra Walls car park. For directions on how to get to Kanangra Walls, see the information on the Kanangra Walls region to the right.
Track notes
From 04 Oct 2008, last checked 11 May 2013
Day 1: Kanangra Walls to Kowmung River (18km, 890m descent)
From the car park at Kanangra Walls, follow signs to the Plateau Track. Avoid a turn off to the right to Dance Floor Cave and ascend a set of steps on to the plateau proper.
The track out along the plateau crosses a number of rocky clearings, but is fairly wide, obvious and well-maintained. However, you should be heading in a generally easterly direction. There are numerous places to detour off the track to the cliff edge to the north for fantastic views of the Kanangra Creek gorge, Thurat Spires, and Kanangra Falls.
At a large rocky clearing about 1km on to the tops, the trail divides. Neither branch is obvious as the clearing is large. The clearing is just after a short climb from a saddle, and has excellent views from the edge to the north. One branch of the track heads initially east, and then south towards Maxwell Top, and the other leaves from the northern side of the clearing, heading north east along the main part of the plateau. Take the east branch, which climbs up to the top of the ridge and then heads south. Avoid a turn off to the left after another kilometre, and continue along the eroded track which drops into a saddle and then climbs to Murrarang Top. Down the other side, keep left at a fork, and shortly descend through a break in the cliffline.
Make a note of the descent spot for the return trip.
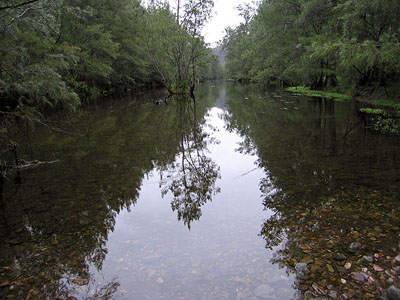
Gingra Reach on the Kowmung River
Continue along to shortly reach the Coal Seam Cave. This is a large overhang which is often used by parties on the Friday night of a weekend walk. At the end of the cave, the track drops steeply down to a saddle, where it forks. The right fork leads up to Cottage Rock, so take the left fork, which contours below Cottage Rock. A further 400m on, keep left on the main track, where a fainter right fork leads up a small knoll, and out towards Bullhead Mountain. Descend into a saddle for about 1km and then climb steeply up to First Top Mountain.
The hill after First Top Mountain is unnamed. As the track goes up the hill, there is a branch veering off to the right. Take this branch, as the other one peters out over the top of the knoll. Just past here another track heads off to the right from a small clearing. This leads down Roots Ridge.
Continue on north east to the small prominence of Second Top, where the track swings east. After 500m, the track swings north east again at another knoll, and you may spot another track branching off to the right down Hughes Ridge. Third Top is a fairly prominent rise a further kilometre along the track. About 800m beyond Third Top the track swings back to the east, descends into a saddle, then rises, keeping to the right of Fourth Top. For the next kilometre or so, the track can be difficult to spot in places, so keep a close watch.
After that, the route to the Kowmung is fairly straightforward. The track is relatively clear, and other than the track dropping on to the lesser ridge around GDA428378 (AGD427376), there are no navigational difficulties.
Once at the junction, look for a spot to camp. There are small campsites on both banks of the river, suitable for a couple of tents, though these areas can be boggy after rain. However, if you have time, there are better campsites down near the old gauging station, about 600m downstream, on either side of the river.
Water can be obtained from Gingra Creek, though it can run underground in dry periods. Many people will also drink water from the Kowmung, though there are farms a long way up in the catchment. Treat the water if you have any concerns.
Day 2: Kowmung River to Kanangra Walls (18km, 890m ascent)
The following day, retrace your steps from the previous day back to Kanangra Walls.
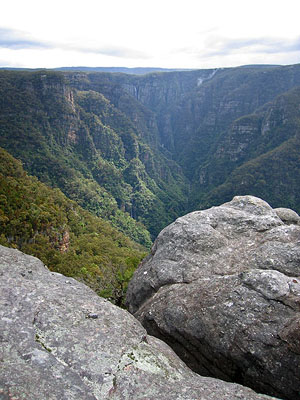
Kanangra Falls and Kanangra Deep from on the Plateau
Walk variations
Compagnoni Pass
Time: 2 days Distance: 38 km Fitness: H Skill: MH Ascent: 1300 m
A harder version of this walk turns it into a loop, via Compagnoni Pass, on the easternmost end of the Ti Willa Tops. To do this as a loop, it is advisable that walkers be familiar with the route from Kanangra Walls to Mt Cloudmaker.
From the Gingra Creek/Kowmung River junction, walk up Gingra Creek a short way and climb the ridge to the north-west of the Willa Creek and Gingra Creek junction. At the Ti Willa cliffline, head right until you can climb up a series of ledges. There are a couple of sections with spikes and chains, but in dry conditions good scramblers should largely be able to do without.
Once on top, follow the tops SW and then NW up to Mt Cloudmaker, and return to Kanangra via the usual route.
In order to make the second day manageable, it is best not to camp at the Gingra Creek junction, but instead to press on, carrying water for the evening and the following day. There is good camping on top near Ti Willa Hill, and there are some camp caves in the cliffline west of Compagnoni Pass.
The walk could also be done as an easier 3-day walk, camping at say Dex Creek, but water options are more limited.
Related walks
Cottage Rock
Time: 4 hrs Distance: 9 km Fitness: E Skill: EM Ascent: 160 m
A relatively easy day walk with excellent views at a number of points along the way.
Bulga Denis Canyon
Time: 3 days Distance: 27 km Fitness: M Skill: MH Ascent: 870 m
An excellent walk showing off the great variety of scenery in Kanangra-Boyd NP.
Hatchers Hollow
Time: 2 days Distance: 24 km Fitness: MH Skill: MH Ascent: 840 m
A challenging walk to this excellent campsite on the picturesque Kowmung River
Orange Bluff
Time: 2 days Distance: 22 km Fitness: EM Skill: EM Ascent: 850 m
The shortest walk from Kanangra Walls to the scenic Kowmung River, with an excellent campsite below the towering Orange Bluff
Kanangra to Carlon's Farm (Green Gully)
Time: 3 days Distance: 36 km Fitness: M Skill: M Ascent: 1380 m
A variant on one of the classic Blue Mountains walks - finishing at Carlon's Farm below Blackheath, rather than at Katoomba
Kanangra to Katoomba
Time: 3 days Distance: 45 km Fitness: MH Skill: M Ascent: 1350 m
An excellent crossing of the southern Blue Mountains with a variety of scenery
Personal reports
11-12/05/2013 - Compagnoni Pass: Kanangra Walls - Coal Seam Cave - Cottage Rock - Gingra Range - Kowmung River - Gingra Creek - Willa Spur (C) - Compagnoni Pass - Ti Willa Plateau - Mt Cloudmaker - Gangerang Range - Gordon Smith Pass - Kanangra Walls : the weather was absolutely gorgeous, so it was amazing that there was no-one else doing any overnight walks this weekend at Kanangra (report | photos)
04-06/10/2008 - Gingra Range and Ti Willa Tops: Kanangra Walls - Coal Seam Cave - Gingra Range - Kowmung River (C) - Gingra Creek - unnamed ridge - Thousand Man Cave (C) - Ti Willa Tops - Mt Cloudmaker - Kanangra Walls (report | photos)